You probably don’t think about your heating and cooling equipment every day. Most of us notice it when the house feels too hot, a room stays cold, or an unusual noise interrupts an otherwise ordinary afternoon. At work, it’s often the same story: someone notices a problem, but the details get scattered between conversations, emails, and service visits.
A little organization can make that first conversation much easier. That’s why we built the HVAC Maintenance Checklist & Seasonal Planner, a free interactive tool from Quick Service Search. It helps homeowners, business owners, employees, and HVAC technicians prepare a checklist suited to the property, system, and time of year. You can work through the checks on screen, record what you notice, and print a useful record—or print a blank checklist before you begin.
The tool is designed for use in the United States. It isn’t a substitute for your equipment manual, a qualified inspection, workplace procedures, or emergency services. Instead, think of it as an organized place to begin.
What makes this different from a generic HVAC checklist?
A generic list might tell everyone to check the same equipment in the same way. But a homeowner with a ductless mini-split doesn’t need exactly the same prompts as a technician documenting a commercial rooftop unit.
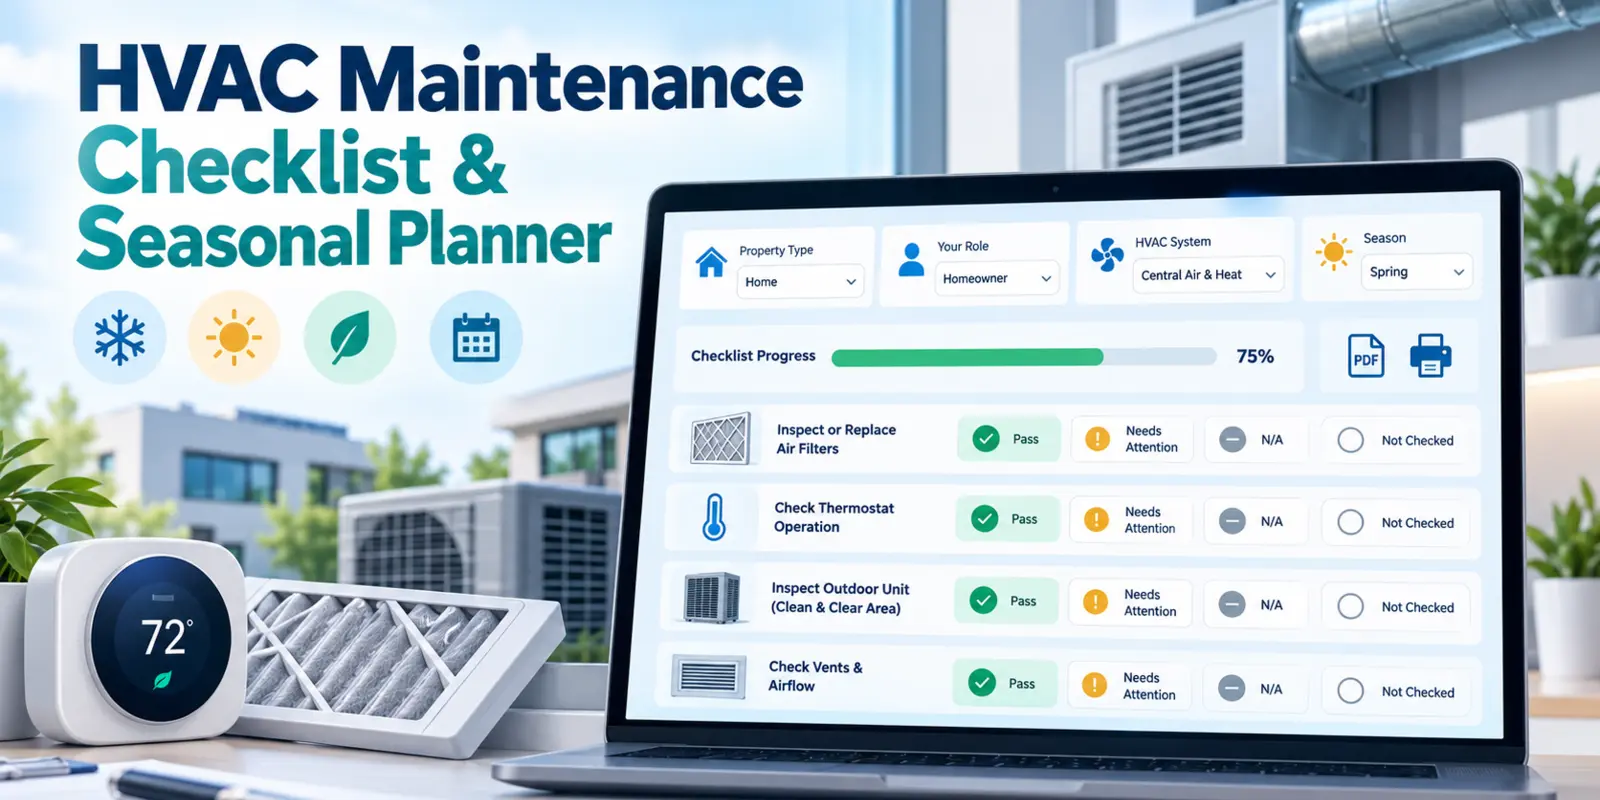
Our planner adapts to four choices:
- Who’s doing the inspection? Homeowner, Business Owner, Employee, or Professional HVAC Technician.
- What kind of property is it? Home / Residential or Business / Commercial.
- What HVAC system is involved? Central Heating & Air Conditioning, Heat Pump, Furnace / Heating, Mini-Split / Ductless, Rooftop Unit, or Not Sure.
- Which season are you preparing for? Spring, Summer, Fall, Winter, or All Seasons / Annual.
Those choices support 240 possible configurations. The resulting list uses prompts appropriate to the selected role, property, equipment, and season rather than presenting every possible task to everyone.
Choosing “Professional HVAC Technician” does not verify training, licensing, access, or authorization. Professional-only entries are documentation prompts for appropriately qualified people, not step-by-step instructions for an untrained visitor to perform hazardous work.
Step 1: Set up your checklist in four questions
Open the HVAC Maintenance Checklist & Seasonal Planner.
The setup begins with one question at a time. Choose your answer to continue automatically, or use Back if you want to reconsider a selection. You don’t need to create an account or download a template first.
For example, a homeowner preparing a central heating and cooling system for spring would choose:
Homeowner → Home / Residential → Central Heating & Air Conditioning → Spring.
A business facilities employee with an unfamiliar system could instead select Employee → Business / Commercial → Not Sure → All Seasons / Annual. “Not Sure” is a real option; the planner won’t pretend to know what equipment is installed.
After four answers, you’ll reach a setup summary showing your selections. Review them before moving on. Each answer has an Edit option, so you can correct the season, system, or role without starting from scratch.
From this screen you can choose Generate Checklist, or go straight to Print Blank Checklist. That second option is especially useful if you’ll be walking around with paper, taking notes during a site visit, or sharing a form with someone who won’t have a device handy.
Step 2: Work through the interactive HVAC inspection
Select Generate Checklist to open your personalized list. Tasks are organized into categories to make them easier to follow.
Depending on your selections, prompts may cover accessible air-filter conditions, thermostat settings, vents and airflow, unusual sounds or odors, visible moisture, equipment surroundings, or maintenance records. Other categories are included only when relevant to the chosen equipment and role.
Each task includes a short description and a Watch for note highlighting observations worth recording. You don’t have to guess what to do with a task: the How to Check button beside its status field expands additional information, including:
- What to observe or document.
- What a normal observation might look like.
- Signs that deserve attention.
- Sensible next steps and safety considerations.
The extra guidance is designed for the interactive experience. It stays off the printed checklist, keeping the paper version concise.
Important: A maintenance observation is not a safety clearance. If something looks unsafe, don’t continue simply to reach 100% completion.
Step 3: Mark each task with one of four inspection results
Every item starts as Not Checked. As you go, you can change its status:
| Status | What it means |
|---|---|
| Pass | You carried out the applicable observation and did not identify the listed concern. |
| Needs Attention | You noticed something that should be recorded or followed up. |
| Not Applicable (N/A) | The item doesn’t apply to this particular inspection. |
| Not Checked | You haven’t evaluated the item yet. |
These labels organize observations. A Pass mark is not proof that the equipment is safe or compliant.
As you update the statuses, a green progress bar fills and the inspection summary shows the number of applicable, inspected, not-checked, and excluded tasks, together with counts for Pass and Needs Attention.
Completion is about documentation—not certification. A checklist can reach 100% even if several tasks are marked Needs Attention. N/A items are excluded from the applicable-task completion calculation, and an inspection containing only N/A items is not represented as a passed inspection.
Step 4: Record what you actually noticed
A status alone doesn’t always tell the story. Under each checklist item you’ll find a Task notes area where you can type a useful observation.
For example:
“Upstairs bedroom gets noticeably warmer around 4 p.m.; supply vent is clear, but airflow feels weaker than downstairs.”
That note gives a future service conversation more context than a vague “AC problem.”
Professional-specific prompts may also include fields for recording measurements where relevant. These fields are for trained, authorized users and don’t make the website a substitute for manufacturer procedures or qualified judgment.
You can also expand and collapse How to Check guidance at any point. The information remains available while you work through the checklist.
Step 5: Add inspection details and review the findings
When you’re ready, choose Continue to Inspection Details. The optional form lets you include information such as the inspector’s name, inspection date, location or address, organization, equipment identifier, manufacturer and model, and Additional Information / Observations.
Next, View Findings Summary brings together the important parts of your record: the configuration used, progress and task counts, items marked Needs Attention, and observations you’ve recorded.
This makes it easier to review what still needs follow-up before printing. You can return to the checklist or edit the inspection details without losing your work during the active page session.
Step 6: Print a blank checklist, a completed report—or both
Printing is one of the planner’s most useful features. There are three print options available from the findings stage:
Print Blank Checklist
Creates an unmarked checklist tailored to your selected role, property, equipment, and season.
The printed form includes unmarked status boxes, room for handwritten notes beside individual tasks, and a shared Additional Information area. It’s useful before a walkthrough, for a clipboard inspection, or when you need a paper form for someone else.
You can also print this version directly from the setup summary, without filling in an online inspection first.
Print Completed Checklist
Includes the inspection statuses, notes, measurements when entered, and the optional inspection details you’ve provided. Fields you leave empty remain available for handwriting after printing, and the Additional Information area keeps writing space even if you didn’t type anything.
Print Both
Prepares the blank and completed versions together so you can keep a record of the observations and also have a fresh copy for future use.
The print layout is designed for US Letter and A4 pages. It keeps the task-by-task guidance off the paper to save space, and includes an inspected-location field and an Inspector Signature line at the bottom of the report. Use your browser’s print dialog to print or choose Save as PDF.
An automatically generated report isn’t an official inspection certificate, safety determination, or proof of regulatory compliance.
What happens to my checklist when I leave the page?
You don’t need an online account to use the planner.
When browser storage is available, the tool can save non-sensitive progress, including your four setup choices and task result statuses, on the device you’re using. That makes it possible to restore progress when you return using the same browser profile.
There is an important distinction: typed inspector details, free-text task notes, and measurements are not saved persistently by the planner. They’re kept in the active page session. Closing or reloading the page can lose those entries.
If your notes matter, print or save the completed report before leaving. You can also reset an inspection or clear saved progress from the tool. Someone using the same browser profile might be able to view previously saved non-sensitive statuses.
For more information, read the Quick Service Search Privacy Policy.
Safety comes before finishing a checklist
The planner displays an immediate-danger notice and offers expandable safety warnings. If you suspect a gas or propane leak, carbon monoxide exposure, fire, smoke, electrical arcing, unsafe water near electrical equipment, or another serious hazard, stop the inspection, move to safety, and call 911 from a safe location when emergency help is needed.
Do not enter unsafe rooftop or elevated areas, open electrical equipment, handle refrigerants, or perform other professional work without proper authorization, training, and procedures. Manufacturer instructions and applicable law always take priority.
Who will find the planner useful?
Homeowners can use it to keep track of accessible checks, prepare for seasonal weather, and take better notes before arranging maintenance.
Business owners can organize observations at a property without confusing a routine walkthrough with a certified inspection.
Employees and facilities staff can document visible issues and communicate them clearly to the person responsible for the building.
Qualified HVAC technicians can use the role-specific prompts as a documentation aid alongside their own procedures and equipment-specific records.
It can also help when preparing for a maintenance appointment, tracking recurring comfort complaints, discussing unresolved issues with a provider, or keeping consistent records across seasons.
Need to explore an HVAC service connection?
After the findings summary, the tool offers a link to the existing Services directory if you want to explore currently listed HVAC connections. Check coverage, equipment type, availability, and terms directly with the provider before moving ahead. The directory doesn’t guarantee that a provider serves a particular address.
For everyday maintenance ideas beyond the interactive planner, see our existing HVAC maintenance checklist guide.
Try the free planner
If you’ve ever wished you had written down what you checked last spring—or wanted a clearer way to explain a heating or cooling problem—this tool gives you a practical starting point.
Create your personalized HVAC Maintenance Checklist & Seasonal Planner, print it blank or completed, and keep the observations that matter to you.
Share this article
Know someone who might find this useful? Pass it along.